> ## Documentation Index
> Fetch the complete documentation index at: https://docs.appreval.com/llms.txt
> Use this file to discover all available pages before exploring further.
# Getting started with Reval: install and set up your store
> Install Reval in your Shopify store, connect Mercado Pago and create your first recurring subscription plan in under 15 minutes.
Reval installs directly into your Shopify admin and requires no code changes or additional infrastructure. Follow this step-by-step guide to get your store ready to sell recurring subscriptions charged through Mercado Pago.
The Reval dashboard walks you through it: while any setup is still missing you'll see the **"Getting started"** card with the real status of each item (credentials saved, webhook verified, first plan created) and a direct link to this guide. It disappears on its own once everything is ready.
Reval requests the following permissions in your Shopify store at install time:
* **Read**: orders, products, taxes, shipping rates and customer data.
* **Write**: creating and updating recurring orders.
These permissions are strictly necessary to generate the automatic charges and to calculate shipping and taxes in real time during checkout.
Reval is a **custom distribution** app: it isn't published on the Shopify App Store. You'll receive an install link generated specifically for your store.
Open it with the store owner's session and accept the permissions. Once installed, Reval appears under **Apps** inside your admin, embedded — there's no external site to log into.
The link is anchored to your store's domain and only works for that store.
Reval needs access to your Mercado Pago account to create the recurring charge mandates and to receive the notification for every charge.
**There is no OAuth connection**: credentials are copied from the MP panel and pasted into Reval, where they're stored encrypted for your store.
Everything that follows happens in the **Mercado Pago developer panel**, inside your application. If you haven't created it yet, step 2.0 guides you; if you already have it, skip straight to 2.1.
**Create a new application dedicated to Reval. Don't reuse the one you use to charge in your checkout.**
For two reasons:
* **Each application is created for one Mercado Pago product.** A checkout application does not enable the Subscriptions APIs, which are the ones Reval needs for recurring charges.
* **Each application allows only one webhook URL per mode.** If you paste Reval's URL into an application that already has a webhook configured, you overwrite it — and your checkout's notifications stop reaching where they were going, with no warning at all.
Having two applications **does not separate your money or your accounts**: both belong to the same Mercado Pago account and everything is credited in the same place. An application is an integration credential, not a wallet. There's no cost and no limit.
If you sell with Mercado Pago but have **never been into the developer panel**, you probably don't have an application of your own: Shopify's payments integration is linked from the store admin, without going through there. In that case, just create your first one.
#### 2.0 — Create the application (first time only)
Go to the [Mercado Pago developer panel](https://www.mercadopago.com.ar/developers) with the MP account that will charge the subscriptions. Use your own country's domain (`.com.br`, `.com.mx`, `.cl`, and so on). At the top right, open **Integraciones** (Integrations): you'll see the **Tus aplicaciones** (Your applications) list.
The Mercado Pago panel is shown in the language of your account's country, so the labels below are given in Spanish — exactly as they appear in the screenshots — with the English meaning in parentheses.
 1. Click **Crear aplicación** (Create application).
2. **Nombre de la aplicación** (application name, step 1 of 4): a descriptive name, for example your store's. Up to 50 characters. **Continuar**.
1. Click **Crear aplicación** (Create application).
2. **Nombre de la aplicación** (application name, step 1 of 4): a descriptive name, for example your store's. Up to 50 characters. **Continuar**.
 3. **Payment type** (step 2 of 4): choose **Pagos online** (online payments).
 Selecting it brings up the question **"¿Cómo hiciste la tienda?"** (how did you build the store?): choose **Con un desarrollo propio** (with a custom build). The store URL is optional — you can enter your store's domain or leave it empty. **Continuar**.
 Even though your store is on Shopify, the correct option is **Con un desarrollo propio** — Reval's subscription checkout is custom-built, not a platform's.
4. **Payment solution** (step 3 of 4): in the **Checkouts** tab, choose **Checkout API** (the "advanced integration" one — it's the only one of the three that combines payments inside your store with recurring payments). If it asks which type of Checkout API, choose **API de Pagos** (Payments API). **Continuar**.
Even though your store is on Shopify, the correct option is **Con un desarrollo propio** — Reval's subscription checkout is custom-built, not a platform's.
4. **Payment solution** (step 3 of 4): in the **Checkouts** tab, choose **Checkout API** (the "advanced integration" one — it's the only one of the three that combines payments inside your store with recurring payments). If it asks which type of Checkout API, choose **API de Pagos** (Payments API). **Continuar**.
 5. **Confirm** (step 4 of 4): review the summary (Pagos online · Con un desarrollo propio · Checkout API · API de Pagos), tick the personal data authorization, solve the captcha and click **Confirmar**.
 With the application created, open it from **Tus aplicaciones** and carry on with step 2.1.
#### 2.1 — Copy the production credentials
In the side menu, scroll down to **PRODUCCIÓN → Credenciales de producción** (Production → Production credentials).
With the application created, open it from **Tus aplicaciones** and carry on with step 2.1.
#### 2.1 — Copy the production credentials
In the side menu, scroll down to **PRODUCCIÓN → Credenciales de producción** (Production → Production credentials).
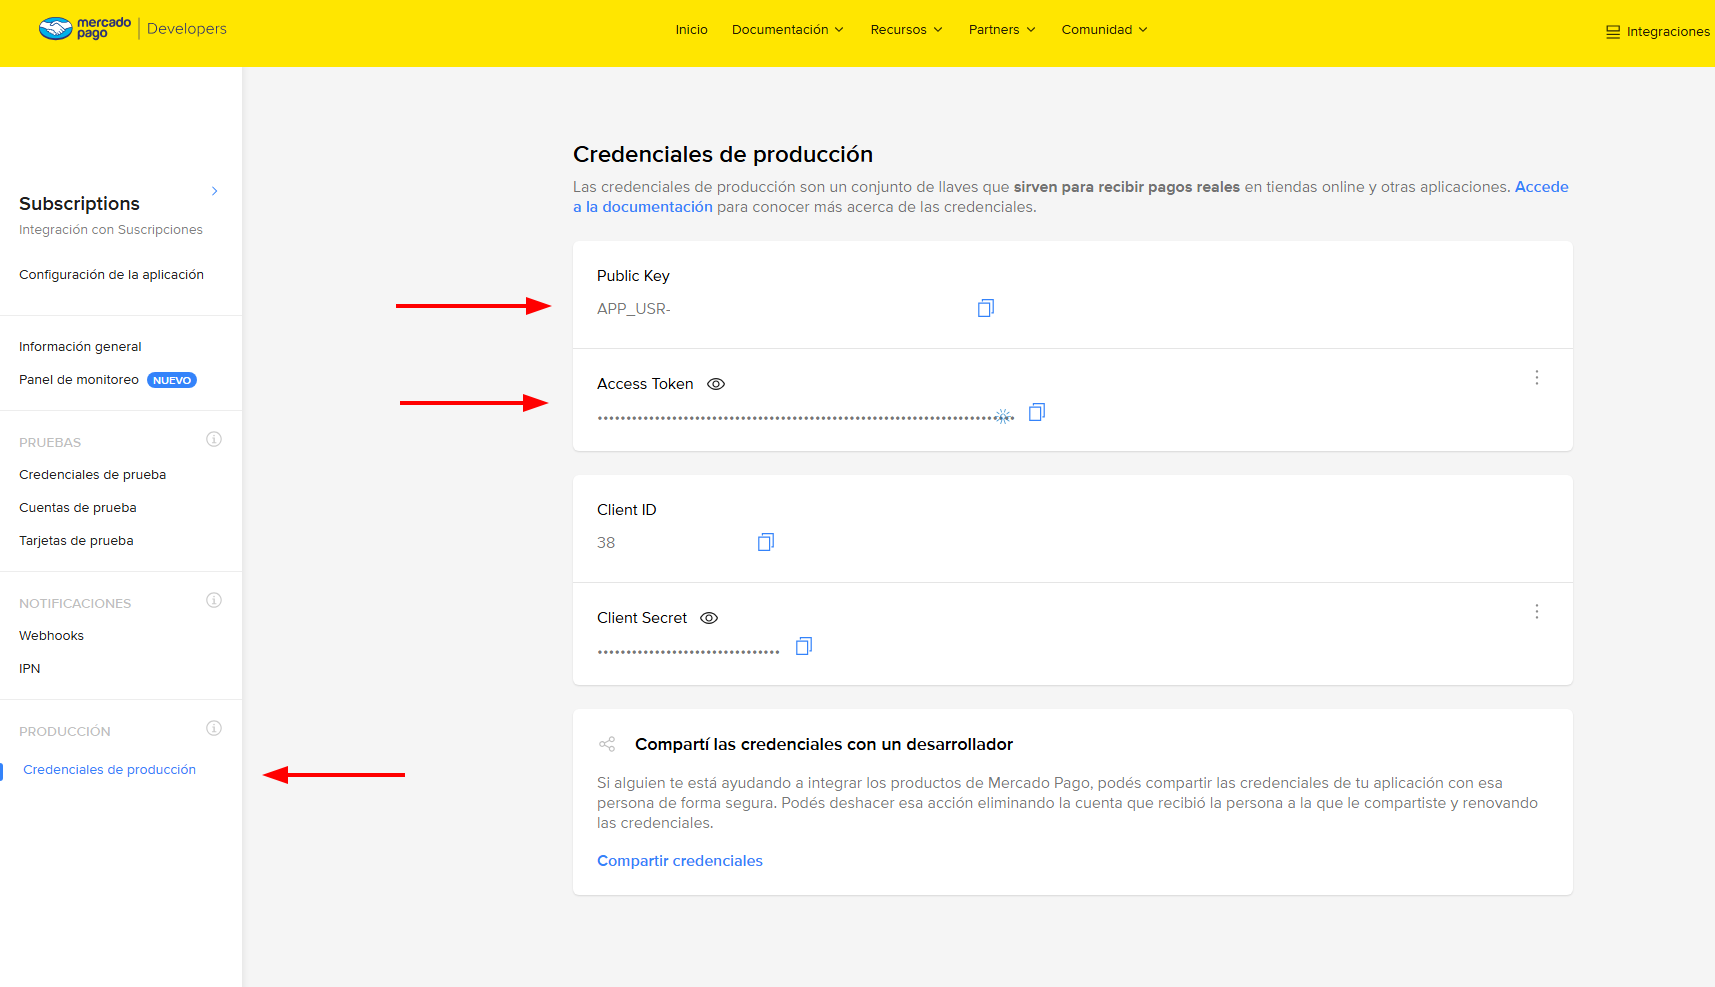 You need **two** values from this screen:
| In Mercado Pago | Where it goes in Reval |
| -------------------------------------------------- | ---------------------- |
| **Public Key** — starts with `APP_USR` | Public key |
| **Access Token** — click the eye icon to reveal it | Access token |
**Client ID and Client Secret aren't used.** They're on the same screen, right below, and it's easy to copy them by mistake. Reval never asks for them.
#### 2.2 — Configure the webhook
In the side menu, go to **NOTIFICACIONES → Webhooks** (Notifications → Webhooks). Make sure you're on the **Modo productivo** (production mode) tab and not on "Modo de prueba" (test mode): they're two independent configurations and the test one isn't used.
You need **two** values from this screen:
| In Mercado Pago | Where it goes in Reval |
| -------------------------------------------------- | ---------------------- |
| **Public Key** — starts with `APP_USR` | Public key |
| **Access Token** — click the eye icon to reveal it | Access token |
**Client ID and Client Secret aren't used.** They're on the same screen, right below, and it's easy to copy them by mistake. Reval never asks for them.
#### 2.2 — Configure the webhook
In the side menu, go to **NOTIFICACIONES → Webhooks** (Notifications → Webhooks). Make sure you're on the **Modo productivo** (production mode) tab and not on "Modo de prueba" (test mode): they're two independent configurations and the test one isn't used.
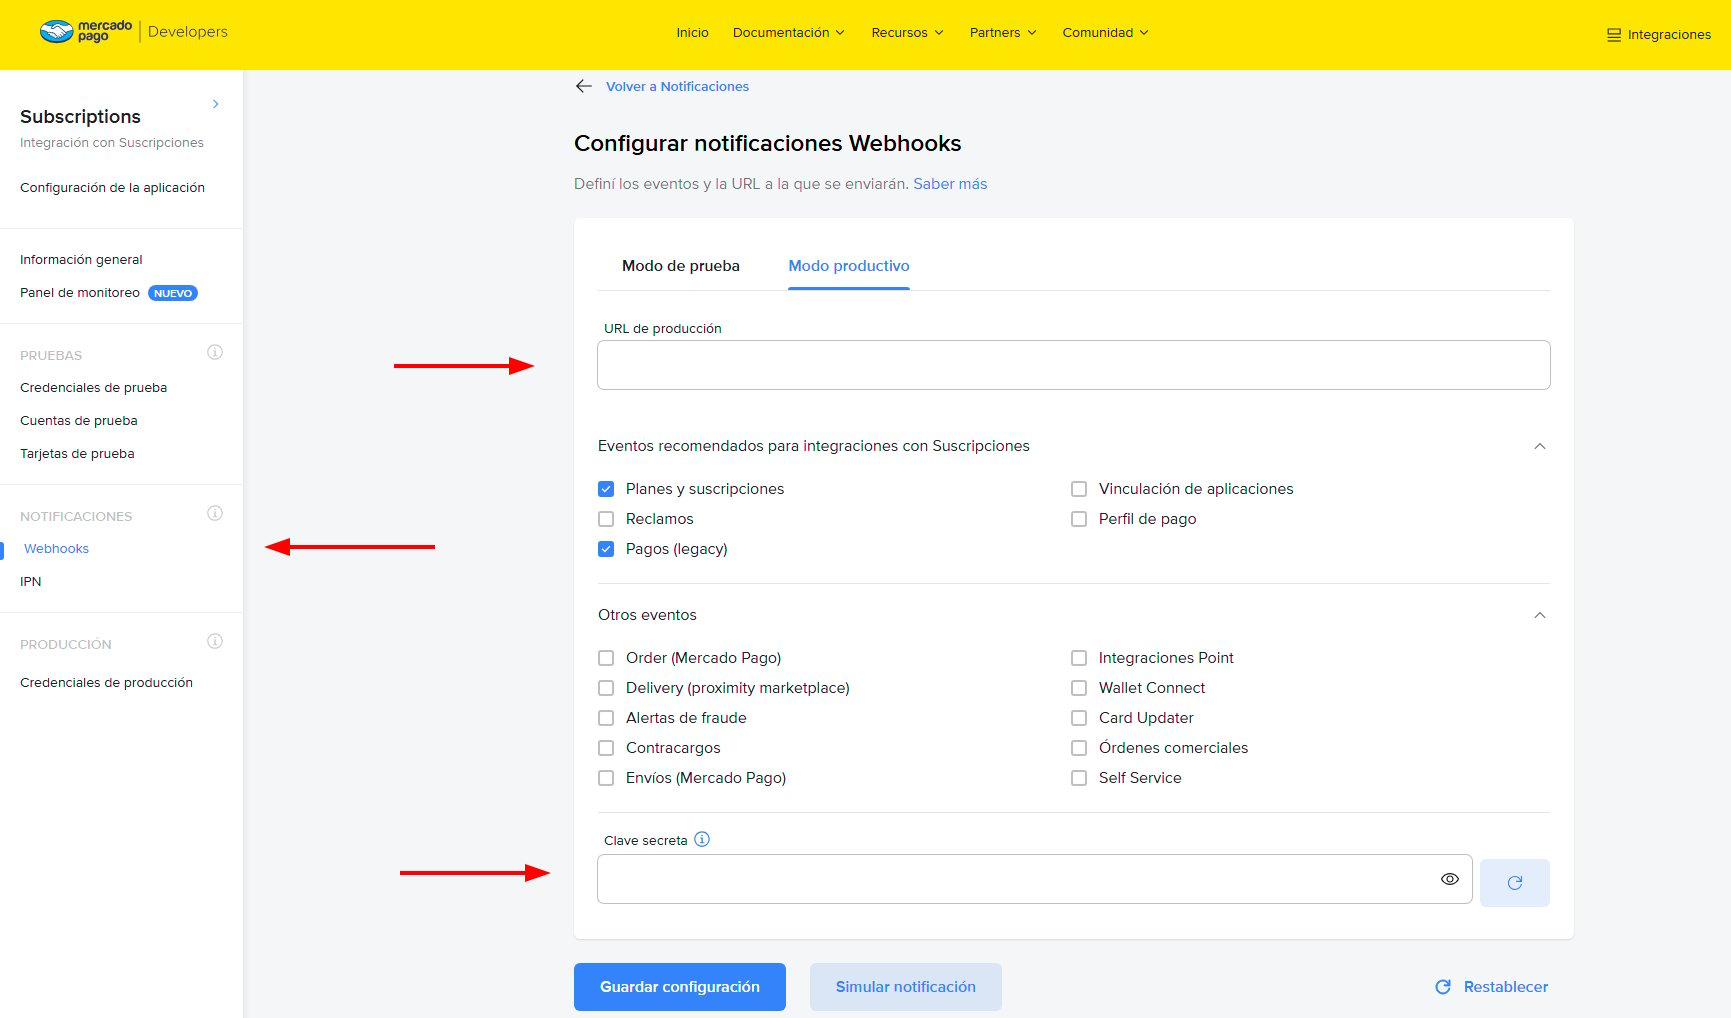 1. In **URL de producción** (production URL), paste the **notifications URL (webhook)** that Reval shows you in **Settings → Integrations — Mercado Pago** (there's a **Copy URL** button next to it). The URL already comes built for your store — there's no need to edit it.
The `?shop=` at the end is not optional: it's what tells Reval which store the notification comes from and which secret key to validate it with. If you omit it, Mercado Pago still responds `200` and everything looks fine, but you're relying on a fallback mechanism. Copy the full URL, exactly as Reval shows it.
2. Under **Eventos recomendados para integraciones con Suscripciones** (events recommended for Subscriptions integrations), tick exactly two:
* **Planes y suscripciones** (plans and subscriptions)
* **Pagos (legacy)** (payments, legacy)
Don't tick any others. Extra events don't break anything, but they generate traffic that Reval discards.
3. Copy the **Clave secreta** (secret key) shown at the very bottom. That's the third value you'll paste into Reval.
4. Click **Guardar configuración** (save configuration).
The refresh button next to the secret key **generates a new one and invalidates the previous one**. If you click it after having configured Reval, webhooks start failing signature validation and charges stop generating orders in Shopify. If that happens, copy the new key and update it in Reval.
The name "Pagos (legacy)" sounds like something discontinued, but it's the right event: it's the one that notifies each individual charge on the mandate, and it's the one Reval listens to in order to create the Shopify order.
#### 2.3 — Paste the three values into Reval
In Reval, go to **Settings → Integrations — Mercado Pago** and fill in:
* **Public key** (starts with `APP_USR`)
* **Access token** (starts with `APP_USR`)
* **Webhook secret** — the secret key from the previous step
Save.
The access token and the webhook secret **aren't shown again once saved**: the fields stay masked. That's the expected behavior. If you need to change them, type the new value over the top and save again.
#### 2.4 — Test the connection
Click **Test connection**. The test uses the saved credentials, so **save before testing**.
If everything is fine, a green message appears with your Mercado Pago account name and your country code (`MLA` Argentina, `MLB` Brazil, `MLC` Chile, `MCO` Colombia, `MLM` Mexico, `MPE` Peru, `MLU` Uruguay).
| What you see | What it means |
| --------------------------------------------------- | -------------------------------------------------------------------------------------------- |
| "Connection OK — *your account* (MLA)" | Done, move on to the next step. |
| "Mercado Pago rejected the access token" | The token is incomplete or is a test one. Copy it again from **Credenciales de producción**. |
| Connection OK but with **a different account name** | Stop here. See the warning below. |
If the name shown isn't your account's, the access token belongs to another account: **stop right there**. A wrong token doesn't throw an error, it would simply charge into the wrong account.
Bear in mind as well that Reval operates with production credentials: **there is no sandbox mode**, and MP's test cards don't work. To validate the flow, you make a real low-value purchase and refund it afterwards.
Plans define the charge frequency and the discount subscribers get relative to the list price.
1. Head to **Plans** in Reval's side menu and fill in the **Create a subscription plan** section.
2. Complete the fields:
* **Plan name**: for example, "Monthly" or "Quarterly with discount".
* **Frequency**: combine a numeric interval with a time unit — **days**, **weeks** or **months**. For example: 1 month for monthly billing, 3 months for quarterly, 14 days for fortnightly.
* **Discount type**: *percentage discount* (between 1 and 99, off each product's list price) or *fixed price* (the same amount for every product in the plan). If you don't want to apply a discount, use fixed price with the product's normal price.
* **Extra discount on 1st order** (optional): an additional percentage that applies ONLY to the first charge. From the second cycle onward the plan's normal price is charged, and the buyer sees both prices before subscribing.
3. Select the products and click **Create plan**.
Mercado Pago has a **minimum amount per charge** (it depends on your account's currency). Reval won't let you save plans whose final price falls below that minimum, and it shows you the exact value when you try — if you see that notice, raise the price or lower the discount.
You can create as many plans as you need. Buyers will see them as options in the product's buy box.
The buy box is the widget that appears on the product page and lets the buyer choose between a one-time purchase and subscribing. You add it as an **app block** from the theme editor — no code required:
1. In Shopify: **Online Store → Themes → Customize**.
2. Open a **product page** and, in the product information section, click **Add block → Apps → "Reval"**.
3. Save. The block positions itself next to the purchase buttons (quantity → options → subscribe button), wherever you leave it.
From the block's settings you can edit the **benefits** shown when the subscription is selected, turn on **pre-selection** of the subscribe option, and set a **logo** for the checkout. The **"Mostrar opción de compra única"** setting (show the one-time purchase option, on by default) controls whether the buy box offers buying without a subscription: turn it off to sell the product **by subscription only**.
**Browser tab icon:** in Reval's checkout, the icon shown on the tab comes from your store's **square logo** — uploaded in Shopify under **Settings → Brand → Square logo** (a separate setting from the theme's favicon). If it isn't uploaded, Reval adapts your main logo into a square; it looks better if you upload the square one — the same file you use as the theme's favicon works.
The buy box only appears on products that have an **active plan** — on the rest the block is invisible, so it's safe to add it to the general product template.
1. In **URL de producción** (production URL), paste the **notifications URL (webhook)** that Reval shows you in **Settings → Integrations — Mercado Pago** (there's a **Copy URL** button next to it). The URL already comes built for your store — there's no need to edit it.
The `?shop=` at the end is not optional: it's what tells Reval which store the notification comes from and which secret key to validate it with. If you omit it, Mercado Pago still responds `200` and everything looks fine, but you're relying on a fallback mechanism. Copy the full URL, exactly as Reval shows it.
2. Under **Eventos recomendados para integraciones con Suscripciones** (events recommended for Subscriptions integrations), tick exactly two:
* **Planes y suscripciones** (plans and subscriptions)
* **Pagos (legacy)** (payments, legacy)
Don't tick any others. Extra events don't break anything, but they generate traffic that Reval discards.
3. Copy the **Clave secreta** (secret key) shown at the very bottom. That's the third value you'll paste into Reval.
4. Click **Guardar configuración** (save configuration).
The refresh button next to the secret key **generates a new one and invalidates the previous one**. If you click it after having configured Reval, webhooks start failing signature validation and charges stop generating orders in Shopify. If that happens, copy the new key and update it in Reval.
The name "Pagos (legacy)" sounds like something discontinued, but it's the right event: it's the one that notifies each individual charge on the mandate, and it's the one Reval listens to in order to create the Shopify order.
#### 2.3 — Paste the three values into Reval
In Reval, go to **Settings → Integrations — Mercado Pago** and fill in:
* **Public key** (starts with `APP_USR`)
* **Access token** (starts with `APP_USR`)
* **Webhook secret** — the secret key from the previous step
Save.
The access token and the webhook secret **aren't shown again once saved**: the fields stay masked. That's the expected behavior. If you need to change them, type the new value over the top and save again.
#### 2.4 — Test the connection
Click **Test connection**. The test uses the saved credentials, so **save before testing**.
If everything is fine, a green message appears with your Mercado Pago account name and your country code (`MLA` Argentina, `MLB` Brazil, `MLC` Chile, `MCO` Colombia, `MLM` Mexico, `MPE` Peru, `MLU` Uruguay).
| What you see | What it means |
| --------------------------------------------------- | -------------------------------------------------------------------------------------------- |
| "Connection OK — *your account* (MLA)" | Done, move on to the next step. |
| "Mercado Pago rejected the access token" | The token is incomplete or is a test one. Copy it again from **Credenciales de producción**. |
| Connection OK but with **a different account name** | Stop here. See the warning below. |
If the name shown isn't your account's, the access token belongs to another account: **stop right there**. A wrong token doesn't throw an error, it would simply charge into the wrong account.
Bear in mind as well that Reval operates with production credentials: **there is no sandbox mode**, and MP's test cards don't work. To validate the flow, you make a real low-value purchase and refund it afterwards.
Plans define the charge frequency and the discount subscribers get relative to the list price.
1. Head to **Plans** in Reval's side menu and fill in the **Create a subscription plan** section.
2. Complete the fields:
* **Plan name**: for example, "Monthly" or "Quarterly with discount".
* **Frequency**: combine a numeric interval with a time unit — **days**, **weeks** or **months**. For example: 1 month for monthly billing, 3 months for quarterly, 14 days for fortnightly.
* **Discount type**: *percentage discount* (between 1 and 99, off each product's list price) or *fixed price* (the same amount for every product in the plan). If you don't want to apply a discount, use fixed price with the product's normal price.
* **Extra discount on 1st order** (optional): an additional percentage that applies ONLY to the first charge. From the second cycle onward the plan's normal price is charged, and the buyer sees both prices before subscribing.
3. Select the products and click **Create plan**.
Mercado Pago has a **minimum amount per charge** (it depends on your account's currency). Reval won't let you save plans whose final price falls below that minimum, and it shows you the exact value when you try — if you see that notice, raise the price or lower the discount.
You can create as many plans as you need. Buyers will see them as options in the product's buy box.
The buy box is the widget that appears on the product page and lets the buyer choose between a one-time purchase and subscribing. You add it as an **app block** from the theme editor — no code required:
1. In Shopify: **Online Store → Themes → Customize**.
2. Open a **product page** and, in the product information section, click **Add block → Apps → "Reval"**.
3. Save. The block positions itself next to the purchase buttons (quantity → options → subscribe button), wherever you leave it.
From the block's settings you can edit the **benefits** shown when the subscription is selected, turn on **pre-selection** of the subscribe option, and set a **logo** for the checkout. The **"Mostrar opción de compra única"** setting (show the one-time purchase option, on by default) controls whether the buy box offers buying without a subscription: turn it off to sell the product **by subscription only**.
**Browser tab icon:** in Reval's checkout, the icon shown on the tab comes from your store's **square logo** — uploaded in Shopify under **Settings → Brand → Square logo** (a separate setting from the theme's favicon). If it isn't uploaded, Reval adapts your main logo into a square; it looks better if you upload the square one — the same file you use as the theme's favicon works.
The buy box only appears on products that have an **active plan** — on the rest the block is invisible, so it's safe to add it to the general product template.
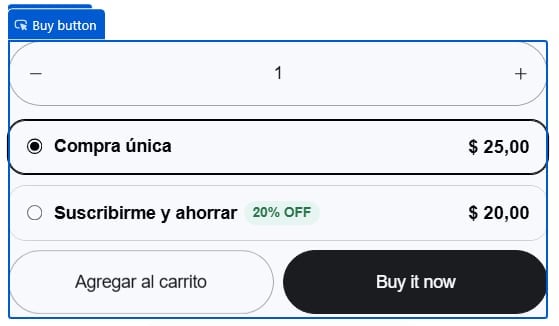 The buy box requires your store's theme to have **JavaScript enabled**. If you use a heavily customized theme or one with blocked scripts, check that the widget loads correctly before publishing it.
Before announcing the feature to your customers, verify that the full flow works end to end.
Since Reval operates with production credentials, the test is done with a **real card and a small amount**, which you refund afterwards. It's worth creating a cheap temporary plan for this.
1. Open the product page where the buy box appears in an incognito window.
2. Choose the test plan and complete the checkout with a real card.
3. Verify that:
* The order appears under **Orders** in the Shopify admin, with the `Subscription`, `First purchase` and `Cycle 1` tags.
* The subscription appears under **Subscriptions** in Reval, in active status.
* The mandate shows up in your Mercado Pago panel.
4. Cancel the test subscription and refund the charge from the MP panel.
If you also offer add-ons, tick one in the test checkout: verify that **two separate charges** appear in Mercado Pago (the mandate's and the add-on's) and that the order includes both lines.
***
## Known limitations
Before launching your subscription program, keep the following current Reval restrictions in mind:
* **There is no on-demand charging**: you can't start a manual charge outside the scheduled cycle. Charges are executed automatically by Mercado Pago on the scheduled date.
* **Skipping a cycle exists, but with an approximate date**: it's enabled from Settings → Orders and inventory, and under the hood it works by pausing the debit and reactivating it one cycle later, so the date of the following charge is decided by Mercado Pago on reactivation. The details are in [Limitations](/en/introduction/limitations).
* **The next charge date can't be changed**: the next cycle's date is determined by Mercado Pago based on the plan's frequency and can't be brought forward or pushed back manually.
* **The frequency of an active subscription can't be changed**: if a subscriber wants to move from a monthly plan to a quarterly one, the only route is to cancel the current subscription and create a new one with the desired plan.
* **There are no backup cards**: each subscription is tied to a single payment method. If the charge fails, no other method is attempted.
***
## Next steps
Now that your store is set up to take subscriptions, explore the following sections to customize and optimize your operation:
Create, edit and archive subscription plans. Learn how to configure frequencies and discounts and assign them to multiple products.
Adjust the per-customer subscription limits, out-of-stock behavior, the thank-you page and more.
The buy box requires your store's theme to have **JavaScript enabled**. If you use a heavily customized theme or one with blocked scripts, check that the widget loads correctly before publishing it.
Before announcing the feature to your customers, verify that the full flow works end to end.
Since Reval operates with production credentials, the test is done with a **real card and a small amount**, which you refund afterwards. It's worth creating a cheap temporary plan for this.
1. Open the product page where the buy box appears in an incognito window.
2. Choose the test plan and complete the checkout with a real card.
3. Verify that:
* The order appears under **Orders** in the Shopify admin, with the `Subscription`, `First purchase` and `Cycle 1` tags.
* The subscription appears under **Subscriptions** in Reval, in active status.
* The mandate shows up in your Mercado Pago panel.
4. Cancel the test subscription and refund the charge from the MP panel.
If you also offer add-ons, tick one in the test checkout: verify that **two separate charges** appear in Mercado Pago (the mandate's and the add-on's) and that the order includes both lines.
***
## Known limitations
Before launching your subscription program, keep the following current Reval restrictions in mind:
* **There is no on-demand charging**: you can't start a manual charge outside the scheduled cycle. Charges are executed automatically by Mercado Pago on the scheduled date.
* **Skipping a cycle exists, but with an approximate date**: it's enabled from Settings → Orders and inventory, and under the hood it works by pausing the debit and reactivating it one cycle later, so the date of the following charge is decided by Mercado Pago on reactivation. The details are in [Limitations](/en/introduction/limitations).
* **The next charge date can't be changed**: the next cycle's date is determined by Mercado Pago based on the plan's frequency and can't be brought forward or pushed back manually.
* **The frequency of an active subscription can't be changed**: if a subscriber wants to move from a monthly plan to a quarterly one, the only route is to cancel the current subscription and create a new one with the desired plan.
* **There are no backup cards**: each subscription is tied to a single payment method. If the charge fails, no other method is attempted.
***
## Next steps
Now that your store is set up to take subscriptions, explore the following sections to customize and optimize your operation:
Create, edit and archive subscription plans. Learn how to configure frequencies and discounts and assign them to multiple products.
Adjust the per-customer subscription limits, out-of-stock behavior, the thank-you page and more.